Showing posts with label Kitchen Tips. Show all posts

Tuesday, June 3, 2014

How to Regrow Green Onions Indoors


Welcome back to Tip Tuesday lovelies! I've got another life changer for you today. And, it's so easy! Like seriously, you have no idea. But you're about to.


You guys! It's true! You CAN re-grow and re-grow onions to your little hearts content off just one bunch!!! This is another one of those gems that I saw on Pinterest that I had to try for myself. And it's easy peasy, so totally my kind of project.

Here's the details:

Next time you use the green part off the top of a bunch of green onions, leave the white portion at the base with at least a small amount of green above (this is necessary to help with photosynthesis I assume....plus, I just wanted to sound smart by using the word photosynthesis.) I typically leave my stem about 1 1/2"-2" in length.


Place stems in a jar of water and set in an area that will get some natural light. It does not have to be direct sunlight just some natural light. I leave mine on my kitchen counters and it is a good 10-15 feet away from the nearest window and mine still grow great! You will begin to see growth after just one day and it's such a fun project for the kids to watch and monitor the growth. What a fun little project for them to even take care of and be "in charge" of. They'll love it!

You will be able to re-grow them back to full size in approximately a week. Trim off when you need some and they'll just grow back again! And again! They're persistent little suckers I tell ya! Cuz trust me, I can kill just about anything and these just keep growing and growing for me. I can usually regrow each bunch about 5 or 6 times before I notice they're beginning to grow slower and not taste as potent. After all, the water does not have any nutrients for growth. At this point you can try placing them in the ground and they should still take hold in the soil or you can just toss them and start over with a new one. Some claim you can regrow these indefinitely, but I have not found that to be the case, but 5 or 6 more bunches after only paying for one? That's good by me!


A few tips I've found:

I change the water daily or at least every other day to keep it fresh. Trust me when I say if you don't do this, they will begin to stink! You may notice in the photo above that there is one stalk that is starting to change color a bit a few inches above the base. This occasionally happens if you haven't changed the water frequently enough and on occasion it happens even when I'm diligent about changing the water. I have found it helps to rinse the onions themselves off every few days to keep them from getting slimy. In this case, I just rinsed them off and then peeled that portion away from that stem. That onion still grew perfectly and didn't have any other issues.

I've heard this works great with several other items such as garlic, celery, parsley, cilantro and romaine just to name a few. We haven't tried any of these yet, but we'll get on it and be sure to report back our success (or lack of). In the meantime I found this website that details 10 Vegetables & Herbs You Can Eat Once and Regrow Forever. Who knew?

Have you tried this before? Have you tried regrowing any other vegetables and herbs? We would love to know what's worked for you. Please share in the comments and thanks for stopping by!

Tuesday, May 13, 2014

Ice Cream Sandwich Cake (Easy, no bake recipe)


Welcome back to Tip Tuesday! Today's tip is a fun, easy, time saver for parties, birthdays and any special occasion warranting a special dessert (such as Tuesday for instance).


I love ice cream. I love cake. Ice Cream Cake? Even better! Your family is going to love this yummy ice cream cake and you are going to love that you can throw it together in 10 minutes flat with no baking whatsoever!


Ice Cream Sandwich Cake

Ingredients:

12 Ice Cream Sandwiches
1 tub of Whipped Cream
Magic Shell Chocolate
Chocolate or Caramel Topping

Optional:
Oreo Cookies (crumbled)
Diced Candy Bars (Snickers, Skor, Twix, Reese's, M&M's, etc.) For this cake I used a Snickers bar and crushed Skor bits. Yum!

Directions:

Begin by layering 3 unwrapped ice cream sandwiches on your plate or platter.


Next, alternate 3 more ice cream sandwiches going the opposite direction.


In between each layer, spread a thin layer of Magic Shell across the top of the ice cream sandwiches. This will become your "glue" to hold the layers together.


Continue stacking until you have reached your desired height. I chose to have four layers on this cake.


Spread whipped cream around all four sides. You don't have to be too neat about this. See...... easy!


Drizzle with chocolate (or caramel) topping, letting the topping run down the sides. Sprinkle with crumbled toppings.


Before serving, place cake in freezer for approximately 20-30 minutes to stiffen the cream up before cutting into it. You may notice my ingredients sat out a little long and are puddling at the base of the cake, but it didn't stop anyone from digging in!


Then sit back and watch the amazement in their eyes when they see you made them an ice cream cake!!! Maybe that mom of the year award might not be so elusive this year! You can serve this for the awards ceremony.

So there you have it! If you're looking for an easy, ice cream cake that will win you rave reviews, this is your gold mine!

Try it out and let us know what you think! What's your favorite quick, no fail dessert?

Tuesday, April 29, 2014

Tip Tuesday


Hello friends! Welcome to Tip Tuesday where we share a tip or trick that we love. Some weeks it might be a kitchen tip, other weeks a home decor tip or an organizing tip.....anything we've found that's made our lives easier. How fun is that?

This weeks tip is a Pinterest fave! Seriously, I think Pinterest makes me better! Hear me out on this one. Yes, sometimes it can be overwhelming to see perfectly decorated homes with what looks like an unlimited budget, someone else's perfectly dressed and behaved children playing quietly with the homemade toy mom just "whipped up" this morning, the lavish breakfast spread to celebrate Groundhog day (doesn't everyone celebrate Groundhog day?). It can be a bit discouraging and sometimes feels like a reminder of all the things we're NOT doing. However, I have found a lot of things on Pinterest that have made my life easier. I try more new recipes. I've found beautiful, free printables for my home. I've read quotes that were just what I needed to hear. I've started more meaningful traditions and found out what works and what doesn't work from other families similar to mine. The trick is to take away what benefits you and not worry about the rest.

Today's tip is one of those where-have-you-been-all-my-life tricks. One of those I-could-kiss-you-on-the-mouth kind of tips. Life changing. I used to dread shredding chicken (and pork) and my arms feel like jello even thinking about it. But not anymore! Introducing........


Many of you may have already seen this on Pinterest but if you haven't seen it or haven't tried it yet, I am here to tell you that you need this in your life. IT WORKS! In seconds flat.

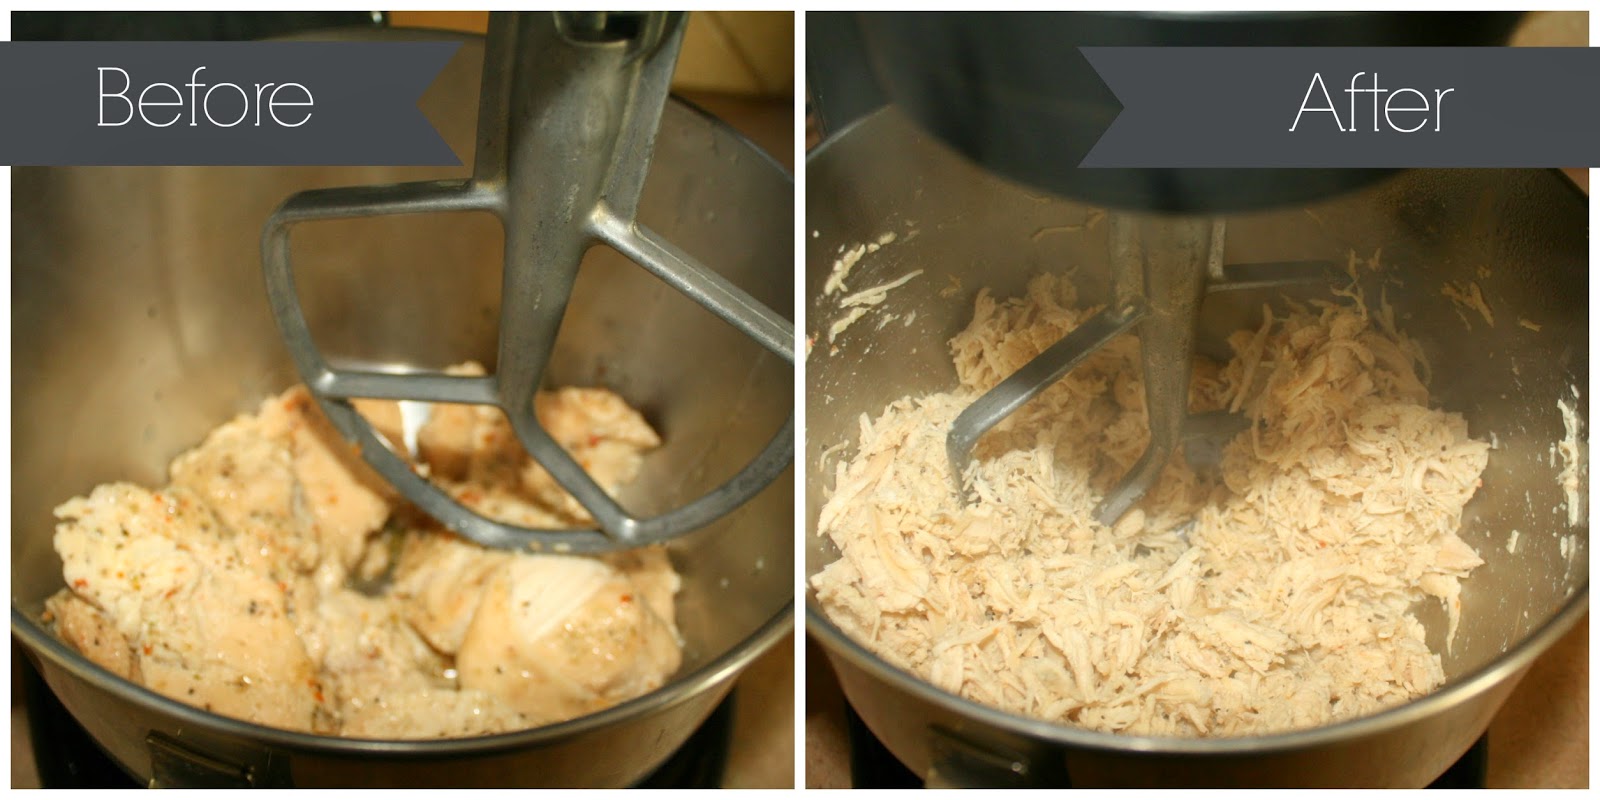
If you have a Kitchen Aid with a paddle attachment, you're in business! Cook your chicken as you normally would for the recipe you are preparing. While the chicken is still hot (this is important), place it in your Kitchen Aid with the paddle attachment.


Start your mixer on low, slowly increasing your speed to medium. I could try to drag this post out by giving you some other invaluable tidbit about this process, but really......that's it. Beat for approximately 30 seconds on medium speed.


Voila! The only real tricks are to shred while the meat is still hot (notice the steam in the above photo) and to watch your speed or else you will have shredded chicken in your hair. Don't ask me how I know. It may or may not go everywhere if you turn your mixer speed too high.

And there you have it. Perfectly shredded chicken in 30 seconds using your Kitchen Aid!


As I said before, I have also used this for shredded pork for homemade Cafe Rio Pork Barbacoa. It works just as effortlessly.


So thank you world of Pinterest for making my life so much easier!

Do you love Pinterest or does it make you feel inferior?

What have you found on Pinterest or elsewhere that makes your life easier? We'd love to hear from you in the comments!