Saturday, December 14, 2013

Allover Wall Stenciling


In a recent bout of ambition that I would later question to be temporary insanity, I decided to try my hand at wall stenciling for the first time. I have a small half bath that I have been remodeling very slowly, since I moved in a year ago. It needed some excitement and the room seemed like just the spot for such a bold and vibrant statement, and happened to have a wall that was the perfect size and texture for a first attempt at stenciling. I felt fairly confident and set off to work on what I was sure would be the perfect project to complete on one of my elusive days off. I really got the rug (or should I say bathmat) pulled out from under me there! It turned out to be a much more time consuming, tedious, and at times downright excruciating project than I had imagined. I laughed, I cried, I painted, I repainted, swore off stenciling for life, probably cried some more, and finally ended up with something that somehow made me forget all the hours I spent cursing myself for not just buying wallpaper. I fall in love with it every time I walk in the room. And best of all, I get to look at it and know I did it myself. As I'd like to think, I learned 500 ways not to stencil a wall. It took me most of the project to perfect my technique, but it could have been much simpler and less time-consuming if I knew then what I know now. This is information that would have really come in handy for me many hours and temper tantrums ago. I would like to pass it on to hopefully make things just a little bit easier for those of  you who might want to give it a try- I promise you it will be worth it!

You will need:
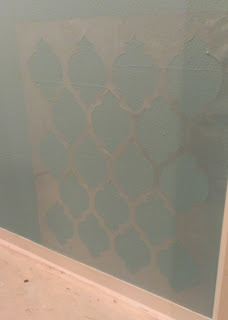
- Stencil of your choice. For my wall, I chose the Casablanca allover wall stencil from cutting edge stencils. This particular stencil included a large allover stencil and two smaller stencils for gaps and edge work (depicted below).
- Interior latex or acrylic paint in the color(s) of your choosing.
- Dense foam roller (I started out using a standard sized paint roller, but after some trial and error, found it was much easier to use a mini foam roller)
-Small, easily controlled paint brushes for touch ups
-Paint tray (or a plate works, if using a mini roller)
-Painters tape
-Low tack spray adhesive (I used Loctite General Performance Spray adhesive)
-Stepping stool
-Punching bag

-Oh and the instructions say you will also need a stencil level, which was said to be included. I'm sure it was. I'm sure knowing me I just lost it, but for whatever reason, I know nothing of this stencil level. Alas! I never even needed it.
Casablanca Allover Wall Stencil from Cutting Edge Stencils

You will want to pick a time that you have the majority of a day to devote to your project. While stenciling seems like a fairly easy process, it can be very tedious, and time consuming. I would HIGHLY recommend doing this on a day where you can be sure to get at least all of the full panels of the stencil up, and not have to stop half way through using it. The adhesive is very difficult to remove, so you will want to try to avoid having to clean the stencil until you are completely through with it. If you run out of time (or steam!) and need to save the edge work, or touch-ups for another day, it is much easier to pick up from there than to try to store your sticky stencil or attempt to clean the adhesive off and start back up later. Not to mention if you are unable to remove ALL of the adhesive, it can leave the back of the stencil slightly uneven, and more likely to bleed, making it much more difficult when you come back to it (could i be speaking from experience?!)
Preparation:
First, you will need a game plan! Visualize your desired finished product, and the overall style you would like to achieve.  Decide if you are wanting it to be a  subtle pattern repeated throughout the room, for example, or a bold colorful design on an accent wall or at a focal point in the room. Based on that, decide which wall(s) you will be working with. Smooth, texture-free walls are ideal to ensure the stencil lays flat and minimal bleeding occurs . Select a stencil that fits the style of the room. I was unable to find allover wall stencils anywhere in town, so you may end up having to order yours online as well. Using the free samples provided at any home improvement store, carefully select colors that compliment one another and the rest of the room.

Fill any nail holes or chips in the wall, so you have a smooth surface to work with, then if you are repainting the base color on the wall, select which color you want to use first (depicted by the positive space on the stencil). I would recommend using the darker color as the background if you are undecided on the order of the two. Then when you have to go through and do touch ups (which if you are as skilled as I was, you WILL), you will have a much easier time covering mistakes. I used the lighter of the two colors first, so when I went over the wall to fix the bleed marks, the touch ups often needed two coats in order to cover the dark. Which was double the work!
Tape the selected wall(s) off with painters tape for clean lines, and after painting, make sure you allow at least 24 hours to fully dry before stenciling. Make sure that you know which color needs to be used first to work with the stencil.

Stenciling:

Once the base coat is dry it is time to start the actual stenciling. Make sure that you are working with a completely clean and dry surface before beginning. Take the stencil in the garage, or outside away from dirt and wind. Lay it on a clean flat surface that you don't mind if it gets very sticky (I used a big flat board I had in my shed). Coat lightly with a low tack spray adhesive*, spraying in short horizontal bursts, as you would coats of spray paint. Use enough to make it noticibly tacky, but not drenched, and give it a minute or two to dry before making contact with the wall so as to not damage the paint underneath. Choose the least conspicuous corner of the wall for your first panel, to ensure you get the hang of things by the time you work your way to more visible parts of the wall. I started in the bottom right-hand corner of the room.
*The instructions that came with the stencil stated that the spray adhesive was optional, and painters tape alone could be used.  For all I know, this may be true, as I did not opt to even try it without it. However, having spent as much time on the project as I did, I was able to really get a feel for things, and I can't imagine trying to work without it.


Line the corner of the stencil with the corner of the wall, and very slowly and carefully lay the stencil down smooth on the wall, making sure there are no bubbles or wrinkles. Be sure that the stencil aligns as perfectly with both of the walls in the corner as possible. I guess this is where the stencil level would have come in! Run your hand or a dry unused paint roller over the stencil, applying enough pressure to ensure that the adhesive is secure to the wall. Tape the edges of the stencil down with painters tape for additional hold if desired. I only found that to be necessary as a lot of adhesive built up on the stencil, or on tricky corner pieces.
Once the stencil is in place, pour a small amount of paint into your tray, and roll your roller in the paint so that it absorbs most of it. Then, using the flat part of the roller tray, roll as much of the excess paint as you can off of the roller. You may even want to roll it once or twice over a folded paper towel to blot the majority of the paint out, and then blot some more! It is almost impossible to have too little paint on the roller. It is much better to do multiple very thin coats than to saturate your roller. You spend much more time on touch ups than you would have spent had you just been patient and sparing in your coats, and you achieve a much cleaner result.
 Having excess paint will cause paint to seep between the stencil and the wall, creating bleed marks (hmmm...experience again?)


Use very little pressure when applying your coats, as pushing too hard can also cause seepage.  No need to allow each thin coat to dry fully, a minute or two between coats is sufficient. I found it worked best to then immediately remove the stencil from the wall when the last coat had freshly been applied and  let the wall and stencil dry separately for a little while before starting the next panel. Allowing them to dry together sometimes caused peeling of paint and imperfect edges when the stencil was lifted away from the wall.
The instructions state that if you would like to check your progress, you can peel your stencil away from the wall, then lay it flat after you have taken a look. I would not recommend this. Shifting the stencil too much allows room for error and risks paint getting on the back of the stencil, and therefore applied to the wall when it is laid back down.  When the first panel has dried enough that you can move on without compromising your work, you can move on to the next.

The wonderful thing about the damask (allover) stencils is that they are designed so that each panel can lock in with the last, so you can overlap and ensure that the patterns line up perfectly. Just be sure to try to avoid re painting over the shapes which overlap. You should not need to reapply the adhesive with each movement of the panel, especially if you are also re-enforcing the stencil with painters tape, and if you are following the two most important rules: Very little pressure, even less paint. When the stencil does start to lose its tack, you can respray it (always on the same side), still using very light coats. Continue to repeat the stencil until the surface of the wall is covered, making sure that each stencil repeat lines up perfectly with the last (and with the walls, when doing panels adjacent to a wall, the floor, or ceiling), so that the stencil can continue to remain level and maintain its consistency.


When I got close to the edges of the wall and didn't have enough room for another full panel, I overlapped the stencil as far as I could without having to bend it. 

At this point, you really only have the gaps to fill in around the edges, top and bottom.


For the bottom, I used the stencil included for finishing the top and bottom. I simply aligned it with the existing design, and taped it off where I wanted it to stop, to ensure clean lines. 


Around the sides, I found it easiest to just align the stencil with the rest of the pattern, bending it slightly just along the edges to completely cover the remainder of the wall, but overlapping as little as possible. Be sure to keep the walls you aren't planning on stenciling taped off at all times to avoid clean ups later. The best way I found to ensure crisp lines when filling in the corners is to line up the stencil and bend (but not crease) it at the seam of the wall. Then tape again over the stencil to hold it in place and solidify that line, so that you don't get paint on the other wall. For the corner pieces, it was easiest to use a small brush instead of the roller. Foam brushes work well because it is better to dab the paint on than to brush it. Using a regular paint brush also works, just use the end of the bristles and apply the paint in a dabbing motion. Remember to continue to use very little paint on the brush! It is especially easy to bleed on the corner pieces because the thick plastic stencil does not bend easily, therefore does not lay flush with the corner. 


Once you are finished stenciling, all you have left to do is the touch ups. If things went well, there should be very few. If you took a while to find your stride, like I did, this might take a little longer (not to mention the fact that I am an insufferable perfectionist). Step back and look at the wall before you start. Most of the minor imperfections you see when working up close are no longer visible. There is no need to kill yourself spending countless hours retracing each and every shape (remember when I said I was insufferable...yeah.). Use a very small, flat paint brush to fix any spots where the paint may have visibly bled outside of the shape.


When you are finished, peel off any remaining tape and step back to admire your work, and basque in your well-earned satisfaction. 

Once the wall is completely dry you are then free to add personal touches. Hang (or re-hang) any wall fixtures or decor. I am still in the remodeling stages in my bathroom, so I will be moving things around, but I quickly arranged this small vignette to show a (somewhat) finished product. 
Stay tuned for the photographs of the bathroom once the remodel is completed!


Last look at the overall finished product.
Due to the extremely small size of the room,  most of the pictures had to be taken from outside of the bathroom, so I apologize for the limited view. Please excuse the picture quality, as the camera used for these shots was not a high quality (aka: I didn't borrow my moms).


Cleaning:
When it is time to clean your stencil, I found it best to lay it flat in the bathtub and run warm, soapy water over it. After letting it sit for a few minutes the paint will just wipe away. You might even want to do this during the process of stenciling if it starts to accumulate a thick layer of paint that might compromise your work after multiple repeats. Do not try to remove the spray adhesive until you are completely done with the stencil. I promise you! Doing so will cause so much unnecessary grief and actually end up being counter productive and making finishing the project so much more difficult and messy. When you are completely done with it, you can try to remove the adhesive to make storage cleaner and easier. One way I found to do it was to leave it soaking in the bathtub after cleaning out the paint until the water got completely cold (warm water just makes the adhesive tacky and is virtually ineffective, not to mention incredibly frustrating), and leaned over the tub, scraping the adhesive off with my thumb nail. This did take a fair amount of time. So, if you don't have the patience (or the fingernails!) to remove the adhesive this way, a small can of Goof Off worked wonders for me! And at only $2.97 at Home Depot, it was well worth the investment. It is a professional strength remover, and a very harsh chemical, therefore requires a little bit of caution when using. Always wear work gloves (it will eat through latex gloves, so use something a little heavier) and don't work on a finished surface, such as a table or countertop, as it will ruin the finish. Leaning over the empty bathtub worked great. Pour small amounts of Goof off at a time onto an old dish rag or towel, and wipe over the adhesive. It comes off fairly easy, with minimal scrubbing. When the adhesive starts to build up on that area of the towel, simply wet a new area and continue working until you have removed all of the adhesive from the back of the stencil. When you are finished, store flat if possible, using large drawers if you have them, or you can sandwich it between two pieces of cardboard, and under a bed. For me, it was easiest and most out of the way to tape it to the underneath side of a large shelf I have in a utility closet, so I don't have to worry about it getting damaged. 


We linked up to The Turquoise Home Work It Wednesday party and Home Stories A To Z

Tuesday, November 19, 2013

Fall Mantle


Happy fall ya'll! I hope you are all enjoying the cooler weather and changing colors. I love so many things about fall! The cool brisk air, a warm cup of cocoa, the changing colors and falling leaves, football season and of course another opportunity to change up the decor a little bit.

Although we hadn't planned on posting anymore until our "real" blog is officially ready to be unveiled, I just had to give you a little sneak peak at what I've been up to around here.

Enter my fall mantle.


Isn't the chalkboard printable fabulous? This beauty is from one of my very favorite sources, the Caravan Shoppe. It's part of a Thanksgiving set called 'All Chalked Up'. This set comes with everything you need to decorate your home and host a stylish Thanksgiving fete. It comes with 3 large quote posters, a large 'Gobble, Gobble Turkey' poster, printable placemats and circle art that could be used for napkin adorning, stickers for take home boxes or anything else your heart desires. It's adorable and I had to have it. The entire set costs $5 and the digital file is sent to your email address immediately after purchasing. Purchase once and print off as many times as you want. Although there are many free printables available on the internet and all over Pinterest, with items from the Caravan Shoppe I know the quality is incredible and the file size is specially made for printing extra large prints so I won't have to worry about quality at that size. Plus, I just love their style! I can spend hours perusing Pinterest for just the right fall print or I can hop on over to The Caravan Shoppe and likely find just what I'm looking for in the click of a button. The print above is the medium size engineer print that I previously posted about here. I printed it at Staples for $3.69 and placed it in one of my favorite thrift store frames (Isn't she a beauty too? For $15.00 she was all mine. After a little happy dance in the aisle). Look for a future post on all the in's and out's of engineer prints coming soon.

Here's a little close up of this not so little beauty.


Swoon.

Sigh.

Moving on.......

Here is a closer look of my fall mantle.


You may notice several items from my Halloween decor post here making a reappearance in my fall mantle. The yarn bottles, wrapped books and white vase are all being re-purposed for this vignette. That's what we're all about here at Like Mother Like Daughter Blog. We believe that good design doesn't have to be expensive. Shopping your own home, re-purposing items from other rooms and carefully selecting thrift store finds can achieve a designer look for a fraction of the cost! Look for a future post on how to decorate a mantle or side table with lots of tips on how to achieve balance and visual interest. For today I will just give you the basics of what I did for this particular mantle. First off,  start out with something that you love....your focal point. You will build your mantle around this key item. For me it was obviously the 'Give Thanks' print. Next I began to place other items in fall colors that complimented one other. I used items of varying heights to create balance. 


Next to the yarn covered wine bottles is a small wooden bowl I found at a thrift store. I dry brushed it with a mustard yellow craft paint and lightly sanded in some places for that chippy, distressed look.


In the center of the mantle are my little thrift store books covered with painters paper. For my fall mantle I changed them up a little by wrapping with twine and threading a few tares of wheat through the twine. Nested on top and to the side of the books are one of my favorite thrift store finds of the month. I picked up these little babies for $.65 each. I adore them. They make me giddy.


The right side of the mantle displays a white vase filled with small sticks and fall leaves. I pulled these from my yard but I will be honest, they have to be changed about every 3-5 days or they start looking a little........well........dead. I have plenty of leaves and branches in my yard that need to be trimmed so I will be supplied throughout the fall, but you may want to take the easy route and go fake. Shhh! Don't tell the decor police that I'm encouraging fake foliage. I hear it's a cardinal sin, but I'm a rebel like that.

Once all my larger items were in place I filled in the gaps with natural elements and textures. With the exception of the pine cone from my yard and the one squash in the last photo, all the other small elements were purchased together in a wicker cornucopia from a thrift store. I knew I likely wouldn't use the cornucopia but $1.50 for all the dried fall accents was a deal I couldn't pass up. I seem to have a lot of those deals I can't pass up don't I? Don't answer that. It was a rhetorical question. 

One last look.


Thanks for stopping by! 


Linking up to:

thatswhatchesaid.net
The DIY'ers


Thursday, October 31, 2013

Spooky Halloween Dinner

Happy Halloween my friends! I hope you are having a spooktacular day so far! I started my morning off with a Pinterest fail. Yeah. It was ugly, but we got a good laugh out of it. More on that later. I may even provide a photo for your amusement so stick around.

Last night our family had our annual "Spooky Dinner". I love holidays and traditions and Halloween is no exception. Every year we have a different menu of Halloween themed "spooky" food. I try to never use the same idea twice although that's becoming harder and harder (ideas welcome!). This year we had our dinner a night early because of work schedules. If you're reading this today (on Halloween), you still might have time to pull this off! If you stumbled upon this post at a later time, save it to Pinterest or to your browser favorites because it's never too early to start planning for next year!

I went super simple this year. Like suuupper simple. Normally "Spooky Dinner" is something I prepare for weeks in advance but let's just say this year has been nuts. After helping with a church dinner for 450 people last night, my grandiose plans were looking about as likely as Miley Cyrus joining a convent. Yeah. Not happening. Then this morning my son had to run the missionaries to urgent care with my car. Five hours later, no car, no way to get to the store, my plans had to make a little adjustment. Flexible, people. We must be flexible. So I made this menu happen with 2 hours from the time I was finally able to get to the grocery store, to the time it was on the table. BAM!

You're going to love how easy this is!


I absolutely love a beautiful presentation and today I had to let that go. As much as it may have killed me, this is all I managed to put together for the table. The thing is.....my kids loved it! They're not going to remember how I set the table, they're going to remember the time we spent together and the traditions we loved. P.S. The tablecloth is a piece of fabric I found at a thrift store for $1! I love the pattern and dimension it gives the table.

Severed Fingers (like I said......"Spooky" Dinner)


Embarrassingly easy. Slightly disgusting. Slice or tear a small portion off the bottom of the hot dog (for the severed area). Slice marks into the hot dogs to resemble knuckles. Carve out an area at the top for the nail bed. Place in a pot of boiling water to cook the hot dogs until warmed through. The "fingers" really look great at this point and you could serve them this way, but I just took it a step further and placed a small piece of sauteed onion in the nail bed area and secured it with a dab of ketchup underneath. Squirt a little ketchup at the base of the finger and you have yourself a pretty creepy dish. My boys LOVED it!

Swamp Juice found  Here

This "Swamp Juice" recipe found over at Purple Chocolat Home was really easy to make and tasted great! Because of my time crunch I just put the punch in a punch bowI, filled a clear glove with water and froze it as an ice cube for the punch. If I had more time I would've taken advantage of the free Swamp Water printable Here.


Bloody Eyeballs
As much as I would've loved to tell you this is my grandmothers famous meatball recipe, you would see right through that. "See" what I did there? Pun intended. These are frozen meatballs with a pimento stuffed olive on top. The sauce is one of my go to favorites from the time my kids were little, but you could easily use another sauce or bottled sauce. Mix 1/2 C. grape jelly with 1/2 C. ketchup (can also use chili sauce), heat in a saucepan until warm. Pour over meatballs for that eerie bloody eyeball look.


Cobweb Dip Here

I used a very basic bean dip recipe from Food.com but you could use any recipe you prefer. I added guacamole to the top of the dip and piped sour cream on in a circular pattern. If you have a piping bag you could use that but I was too lazy so I scooped my sour cream into a ziploc and cut off the corner to drizzle it out. Drag a knife from the the smallest ring in the center to the outside of the guacamole ring to create the webbed effect.


I can't tell you how many pictures like this one are on my camera. Remember my last post? See exhibit A as to why I am never bored.


I froze Dollar store bugs in ice cube trays for a fun addition to the spookiness factor.


Bloody Intestines
I have to admit.....these look pretty gross! They were a huge hit though and they were the first thing gone. Use your favorite breadstick or pizza dough recipe (or use store bought). Roll dough into one large, winding, rope. Twist inside non-stick pan or pan sprayed with cooking spray. I used marinara sauce with garlic to surround the intestines and filled in between each fold. 


Isn't he cute? Store bought bread with store bought spinach dip. Did I mention embarrassingly easy?


Table overview


I found this adorable Halloween Trivia Game with printable cards and envelope at The Mother Huddle. We had a lot of fun playing this game while we ate and visited.


The soda bottle labels are leftovers from the large set I mentioned in my Halloween Decorating post here. They were purchased at Target found in their Dollar Spot. I love them and with 9 labels for $1, I won't feel guilty about tossing them and purchasing new ones next year.

Now as I promised.....here is this mornings Pinterest fail. Have you seen this photo floating around Pinterest?

Halloween Treat Donut Face

It is a really cute idea that seems easy enough. Right? Ha! Not so much. Here's my attempt:


Feel free to laugh. I did! These poor little guys didn't stand a chance! I'm thinking Krispy Kreme doughnuts are too soft to hold the teeth in place. I put the vampire teeth in the center and within seconds they expanded all the way ripping the faces of those cute little guys right open. Mean ole teeth. One little guy had his face explode and his eye popped off right off and shot across the box. Sad day. It's a good thing Krispy Kremes can make anything better.
 
As much as I would've loved to have been able to prepare my extravagant, homemade meal that I had planned out in my mind and served it on a perfectly styled table, that wasn't my life today. I considered not posting this meal because of the dark photos and simplistic meal. To some, maybe this dinner is not "blog worthy", but the funny thing is, one of my sons told me he thought it was the best "Spooky Dinner" ever! We laughed, we enjoyed good food, we enjoyed each others company and most importantly we made memories. One memory that I will take with me is the fact that things don't have to be "perfect" to be perfectly happy.

Have a 'Boo'tiful day!


Friday, October 25, 2013

Friday Faves!

Happy Friday! I hope you have had a great week that and your weekend will be even better! My husband almost always has to work on Saturdays so the weekend isn’t so thrilling anymore. Don’t get me wrong.....weekends are glorious if only for the sleeping in part. No alarm? That’s good stuff right there. But after the hubs is off to work, the teens are off to “hang out”, and the cleaning is done, it tends to get a little boring around here. Okay, I just lied. Twice. First off, the cleaning is never done. I repeat, never. I have these things called teenagers. Not only are they teenagers, but they are the boy kind. And they seem to multiply. Therefore the cleaning is never done. However, the absence of the smell of a boy’s locker room is good enough for me. Lie number two: It is never boring around here. I repeat, never. I have these things called teenagers. Not only are they teenagers, but they are the boy kind. And they seem to multiply. AND feed off each other. Therefore I am never bored. But when I can possibly justify it and my house is imaginary clean, I love to go onto Pinterest, a favorite DIY blog or scan the pages of a magazine. I love looking at pretty things, finding new tips or tricks, discovering a new recipe, or reading a review of a product I’ve been dying to try. It makes me happy. And my friends, I want YOU to be happy! So I thought it would be fun to share with you some of my favorite things I have found this week. Sound like fun? Let’s call it Friday Faves. Feel free to clap and shout with glee.

The Cottage Mix


Seriously? I die.  What's there not to love? All the white! Those floors! Those wood beams! The light fixtures! All of them! Perfection.


https://sphotos-a-iad.xx.fbcdn.net/hphotos-ash3/551004_566786873359416_1640750611_n.jpg


Favorite quote I needed to hear this week. 


quatrefoil-printable-monogram-acrylic-tray-insert-guava-aqua-1
Favorite website I'm excited to share  Here
Ladies, if you are not familiar with Jenny Bevlin, you're in for a treat. Her new website features all of her free, printable, customizable, monogram designs in one convenient place. This is gonna rock your world. Customize your own binder covers, phone chargers, calendars, luggage tags, etc. I love my monogrammed phone charger!

Home Alone Sweater With Double Layer Hood
Favorite Sweatshirt  Here

I need this sweatshirt in my life. Like for reals. This makes me want to curl up under a blanket, in an imaginary clean house, when I am imaginary "bored" and read a good book. Heaven.   


Favorite Bathroom  Here

I died again. I'm in love with the planked walls, the gorgeous tile, the light fixture, the fantasy of leisurely soaking in that tub. With the blinds closed. Very closed. 


Cinnamon and Sugar Mason Jar Shakers
Favorite Afternoon Craft  Here


Who doesn't love a project you can finish in one afternoon and likely have all the supplies on hand for? These powdered sugar and cinnamon & sugar shakers are adorable and super easy! Score!

Last but not least....... 


Drum roll please.........


NYC_Applelicious_lip_balms_UK
NYC Applelicious Glossy Lip Balms  Here

Yes, I realize these might look like a gift for my 10 year old niece, but trust me you'll be hooked. I love these babies! I literally have like 10 of them. They're really moisturizing (Shea Butter, Jojoba & avocado oil) while providing just a hint of shine and color. Check out all the colors at the link above. Color 350 - Blushing Golden is my very favorite - but I warn you it has a touch of shimmer. If that's not your thing and you're looking more for a great nude (wait....that didn't come out right.....) color 351 - Caramel Apple is what I'd recommend. Heck! At $2.59 - $2.99 each - Get 'em both! Remember, I want you to be happy!!! 

What are some of your favorite things? I'd love to hear in the comments!

Have a great weekend!